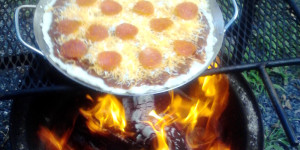
Campfire cuisine: Pizza perfection at the campsite
Kids love pizza. Kids love camping. Seems safe to assume that putting both together would make an incredible combination.
Except pizza is typically cooked in an oven, and while a campfire can easily be used as a rustic stove top, an oven it is not.
But during our recent family camping excursion, I finally had the chance to try out a gift that my wife had gotten me. It helped us merge pizza and camping in ways I never thought possible, and life around the campfire may never be the same!
My wife has been to a number of Pampered Chef parties, and while the products there can seem a little salty in the price department, they do offer some really neat items that are very practical. The chicken lasagna my wife makes in our Pampered Chef stoneware microwaveable casserole dish is amazing. The pizza stone, cookie sheets, microwaveable plastic pots and even the rubber spatulas have been great.
However, my new favorite item is the BBQ Pizza Pan. I’m not suggesting you have to rush to your phone and contact the nearest Pampered Chef consultant. I’m sure there are other similar items available.
Would I trade our Pampered Chef BBQ Pizza Pan for any of those products? No. Not after tasting the end result.
As usual, the best chance for success with cooking anything over a campfire is to start with a well-built fire.
Your pizza’s crust can be completed any way you’re used to doing at home. We typically purchase the generic pizza crust mix packets that require just some hot water and healthy mixing. They are usually pretty cheap (less than a dollar per packet) and crisp up nicely when cooked. We happened to have three crust packets along, so we made all three and divided the dough between two pizzas.
Before spreading the dough onto the pizza pan, we sprayed a light coating of cooking oil onto it. It may not be necessary to take this step, but it doesn’t hurt to be safe when it comes to pizza sticking to the pan after the fact.
We put the ball of dough directly onto the greased pan and started to roll it out as best as possible. If you have soda cans or even the jar from the pizza sauce handy, they can be used as makeshift rolling pins in a pinch. The slots in the bottom of the pan made it necessary to pick up the dough at various points while spreading it out and re-adjusting.
Once your dough is completely flattened out to form the crust, cover it evenly with your favorite pizza sauce. For our family, it is my wife’s homemade sauce that can’t be beat.
Next, we generously spread a layer of mozzarella cheese. Obviously there are countless types of cheeses you can use. Don’t hold back just because this is being cooked over the fire. From experience, though, the thicker the layer of cheese, the less certain you can be of melting it evenly. Campfires produce plenty of heat for cooking, but that heat isn’t always even or predictable from moment to moment depending on the wind and other variables.
And finally come the toppings. Of course, you should dress your pizza however you like. We did two … one for the kids and a special pizza my wife and I shared.
For their pizza, it was simply a matter of adding some pepperonis. The “adult” pie included a number of items we had left over in the camper fridge. Ground sausage and bacon were precooked using a double mountain pie maker. This was something we had cooking on the fire while working on the dough. We also fried up onions, mushrooms and green peppers in the mountain pie maker. It was a neat way to use the pie iron outside of the normal mountain pies. It cooks quickly and fairly evenly and the no-stick seasoning of the iron helped when sliding the toppings off onto the pizza.
With your pizza fully assembled, it is time to get it over the fire. We use a special metal rack and it did the trick here again. I adjusted the rack higher than I typically do for cooking for fear that the crust would burn before the rest of the pizza cooked. That seemed to work well. I also checked it fairly regularly and moved it around so that it cooked evenly.
When the cheese was melted on top and the crust turned a nice and crispy golden brown (there were darker lines where the pizza pan’s slats were that made the bottom of the crust look neatly grilled), the pizza was deemed done. It tasted great, the toppings cooked to perfection and the crust pleasantly crisp.
Yes, kids love camping and pizza, especially when those two things happen together. But I realized after making our own pizza last week that my wife and I love the combination, too!


